

Key Takeaways
- Solar-powered micro-sprinkler systems can cut farm water usage by up to 50% compared to traditional irrigation, while simultaneously slashing energy costs by up to 70% through renewable solar energy.
- Not all farms benefit equally — small-scale, specialty, and organic operations tend to see the fastest return on investment from these systems.
- The type of solar panel you choose (monocrystalline, polycrystalline, thin-film, or bifacial) directly impacts system efficiency and long-term savings.
- Battery storage is the hidden key to keeping your irrigation running through cloudy days and nighttime watering cycles.
- With the right design, even large commercial farms can scale solar micro-sprinkler systems across multiple irrigation zones without sacrificing performance.
Solar-powered micro-sprinkler irrigation is quietly transforming how eco-conscious farmers grow food — and the farms that adopt it earliest are already pulling ahead.
The concept is straightforward: combine solar energy with precision micro-sprinkler delivery to create an irrigation system that’s both water-efficient and energy-independent. But choosing the right setup for your specific farm type, crop selection, and geography is where most farmers get stuck. Growing Solar Mist has become a go-to resource for farmers navigating exactly this decision, offering practical guidance on pairing solar technology with the right irrigation hardware.
What Is a Solar-Powered Micro-Sprinkler Irrigation System?
A solar-powered micro-sprinkler irrigation system uses photovoltaic (PV) solar panels to generate electricity that drives a water pump, which then pushes water through a network of small-diameter pipes to micro-sprinkler heads positioned throughout a field. Unlike large-scale overhead sprinklers that broadcast water across wide areas, micro-sprinklers deliver water in a targeted, low-volume pattern — typically covering a 4 to 12-foot radius per head. This precision dramatically reduces evaporation and runoff.
These systems operate entirely off-grid in most configurations, meaning no electric utility connection is needed. That makes them especially valuable for remote farm plots where grid access is expensive or simply unavailable.
How Micro-Sprinklers Deliver Water Differently Than Other Irrigation Methods
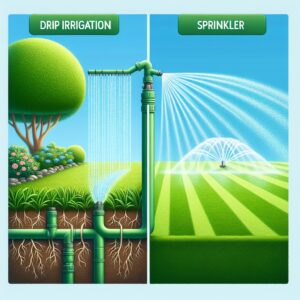
Traditional overhead sprinklers apply water from above in large droplets at high pressure, which increases evaporation and can promote fungal disease on foliage. Drip irrigation goes to the opposite extreme, delivering water directly to the root zone but offering very little coverage for frost protection or germination. Micro-sprinklers sit in the middle — they apply water close to the soil surface in fine, gentle streams that hydrate both the root zone and the immediate surrounding soil without saturating or compacting it. For crops like strawberries, blueberries, citrus, and nursery stock, this delivery method is ideal.
How Solar Panels Power the Irrigation System
Solar panels convert sunlight into direct current (DC) electricity. That DC power either feeds directly into a DC-compatible water pump or passes through an inverter to produce alternating current (AC) for standard pump motors. The pump draws water from a well, reservoir, or municipal source and pressurizes the irrigation lines. Most small-to-mid-scale solar irrigation setups operate with pump capacities between 0.5 HP and 5 HP, depending on field size and water demand. Panel arrays for these systems typically range from 300 watts to over 5 kilowatts.
The Role of Battery Storage in Keeping Water Flowing
Without battery storage, your system only runs when the sun is shining — which creates real problems on overcast days or if your crops need early morning or evening irrigation. Adding a lithium iron phosphate (LiFePO4) battery bank to your system solves this. These batteries store excess solar energy generated during peak sun hours and release it on demand, effectively decoupling your irrigation schedule from weather conditions.
For most small farms, a battery bank sized between 5 kWh and 20 kWh provides enough reserve capacity to run irrigation through one to two sunless days. Sizing depends on your daily pump runtime, pump wattage, and how many consecutive cloudy days your region typically experiences. Getting this calculation right is non-negotiable — undersized storage is one of the most common and costly mistakes in DIY solar irrigation builds.
Quick Sizing Reference: Battery Storage for Solar Irrigation
Daily pump runtime: 4 hours | Pump size: 1 HP (750W) | Daily energy use: ~3 kWh
Recommended battery bank for 2 cloudy days: 6–8 kWh LiFePO4Daily pump runtime: 6 hours | Pump size: 2 HP (1,500W) | Daily energy use: ~9 kWh
Recommended battery bank for 2 cloudy days: 18–22 kWh LiFePO4

The 4 Solar Panel Types Best Suited for Farm Irrigation
Choosing the wrong panel type for your farm’s conditions is an expensive mistake that affects both daily output and 25-year system performance. Here’s how each option stacks up. For more detailed insights, explore our guide on solar panels and micro-sprinkler irrigation systems.
1. Monocrystalline Panels: Best Efficiency for Space-Limited Farms
Monocrystalline panels are cut from a single silicon crystal, giving them the highest efficiency rating of any commercially available panel type — typically between 19% and 23%. That means you get more electricity per square foot of panel surface, which is critical when your mounting space is limited, like on a small rooftop barn or a narrow equipment shed. For more information on the benefits and installation, check out this installation guide.
These panels also perform better in high-heat conditions compared to polycrystalline options, losing less output as temperatures climb — a meaningful advantage during summer irrigation season in hot climates like California’s Central Valley or the Texas Panhandle. For more insights on how these systems can benefit your farm, explore the benefits of solar panels for farm irrigation systems.
|
Panel Type |
Efficiency Range |
Best For |
Typical Cost per Watt |
|---|---|---|---|
|
Monocrystalline |
19%–23% |
Space-limited farms, high-heat climates |
$0.90–$1.20 |
|
Polycrystalline |
15%–18% |
Large flat fields, budget builds |
$0.70–$0.90 |
|
Thin-Film |
10%–13% |
Low-light regions, irregular surfaces |
$0.50–$0.75 |
|
Bifacial |
21%–27% |
High-reflectivity ground cover, open fields |
$1.00–$1.40 |
The higher upfront cost of monocrystalline panels is almost always recouped faster on farms where every square foot of panel real estate counts.
2. Polycrystalline Panels: A Cost-Effective Option for Larger Setups
Polycrystalline panels are made from multiple silicon fragments melted together, which makes them cheaper to manufacture but slightly less efficient — typically 15% to 18%. On a large, open farm with plenty of ground-mounting space, that efficiency gap matters far less because you can simply add more panels to compensate.
If you’re building a system to irrigate 10 or more acres and have a flat, south-facing field with room for a ground-mounted array, polycrystalline panels can deliver the same total output as monocrystalline at a noticeably lower installation cost. The trade-off is space: you’ll need roughly 20% to 30% more panel area to generate the same wattage.
For budget-conscious farm operations where land for panel installation is plentiful, polycrystalline remains a very practical and widely used choice.
3. Thin-Film Panels: Flexible Use in Low-Light Regions
Thin-film panels are manufactured by depositing photovoltaic material onto a substrate like glass or metal. They’re the least efficient panel type commercially available, but they carry one significant advantage: they perform better than crystalline panels in diffuse or low-angle light conditions. If your farm is located in the Pacific Northwest, the UK, or any region with frequent cloud cover, thin-film panels can produce more consistent daily output than their efficiency numbers on paper would suggest.
They’re also lighter and more flexible, making them suitable for curved rooftops or unconventional mounting surfaces that can’t support heavier crystalline panel frames.
4. Bifacial Panels: Double-Sided Energy Capture
Bifacial panels generate electricity from both their front and rear surfaces by capturing light reflected off the ground below them. On farms with light-colored soil, gravel pathways, or reflective mulch, rear-side energy gains can add 10% to 27% additional output compared to a standard monofacial panel of the same rated wattage. They require elevated ground mounts that allow light to reach the panel’s underside, but the energy premium they deliver makes them increasingly popular on open field irrigation installations.

Small-Scale and Specialty Farms Benefit Most
When you look at the return-on-investment timeline for solar micro-sprinkler systems, smaller specialty farms consistently come out ahead. The reason is simple: these farms typically have high water precision requirements, limited acreage, and crops with enough per-unit value to justify the upfront investment in efficient irrigation infrastructure.
A 2-acre strawberry operation, for example, demands far more irrigation precision than a 200-acre wheat field. Strawberries are sensitive to both overwatering and drought stress, and their shallow root systems respond immediately to changes in soil moisture. A solar micro-sprinkler system on this type of farm can mean the difference between a premium yield and significant crop loss — all while running completely off-grid.
The financial math is also more favorable at smaller scales. A small specialty farm that previously paid $400 to $700 per month in electricity to run a conventional irrigation pump can eliminate nearly that entire cost with a properly sized solar array — often within 4 to 7 years of installation, after which the system runs at near-zero energy cost.
Why Organic Farms Are Ideal Candidates
Organic farms operate under a philosophy that aligns almost perfectly with solar-powered irrigation: minimize synthetic inputs, reduce environmental impact, and work with natural systems rather than against them. Solar micro-sprinklers extend that philosophy directly into water management. By eliminating diesel or grid-powered pumps, certified organic operations can document a fully renewable energy footprint for their irrigation — something that resonates strongly with premium buyers and certification bodies alike.
There’s also a practical agronomic fit. Organic crops like heirloom tomatoes, herbs, and leafy greens often require gentle, consistent moisture delivery to avoid stress-induced bolting or disease pressure. The low-volume, fine-spray output of micro-sprinkler heads delivers exactly that — without the soil compaction or foliage damage that high-pressure overhead systems can cause.
Fruit and Vegetable Farms with High Water Precision Needs
Blueberries, strawberries, peppers, melons, and citrus are among the crops that benefit most from micro-sprinkler precision. Each of these crops has a narrow window of optimal soil moisture — too dry and fruit size suffers, too wet and root rot becomes a serious risk. Micro-sprinklers allow farmers to dial in coverage radius, precipitation rate, and run time to match the exact water budget each crop needs at each growth stage. For farms looking to enhance their irrigation systems, exploring solar panel power solutions can be a sustainable choice.
Beyond soil moisture control, micro-sprinklers serve a critical frost protection role for fruit crops. When temperatures drop below freezing, running micro-sprinklers coats tender buds and blossoms with a thin layer of ice that actually insulates plant tissue and holds it at 32°F — preventing the cell damage that would otherwise destroy an entire bloom set. This frost protection capability alone justifies the system investment for many citrus and berry growers.
The solar-powered component adds another layer of reliability here. During spring frost events — which often occur on cold, clear nights following sunny days — solar batteries charged throughout the day provide the energy needed to run frost protection cycles through the early morning hours when temperatures are coldest. No grid connection required, no diesel generator to maintain.
Nurseries and Greenhouse Operations
Nurseries and covered greenhouse operations represent one of the highest-value use cases for solar micro-sprinkler systems. The density of plant material per square foot is extreme compared to field crops, and water uniformity across hundreds or thousands of individual containers directly determines product quality and salability. Uneven irrigation in a nursery means some plants are stunted while others are overwatered — both outcomes reduce sellable inventory and profit margins.
In greenhouse settings, solar panel arrays are typically installed on the greenhouse roof or on adjacent ground-mounted structures. The panels power not just the irrigation pump but also automated controllers that trigger watering cycles based on timer schedules, soil moisture sensors, or evapotranspiration data pulled from on-site weather stations. This level of automation reduces labor costs significantly, particularly on nurseries that manage multiple crop varieties with different water requirements.
Example Setup: Small Nursery Solar Micro-Sprinkler System
Operation size: 1 acre of containerized nursery stock
Solar array: 2.4 kW monocrystalline panel array (8 x 300W panels)
Battery storage: 10 kWh LiFePO4 battery bank
Pump: 1 HP DC submersible pump
Micro-sprinkler heads: 180 units at 6-foot spacing, 10 GPH output per head
Controller: Automated timer with soil moisture sensor override
Estimated daily water delivery: 1,800 gallons across 4 irrigation cycles
Estimated annual energy savings vs. grid-powered equivalent: $1,800–$2,400
Large-Scale Farms Can Scale These Systems Too
The assumption that solar micro-sprinkler systems only make sense for small operations is simply outdated. Commercial farms irrigating 50, 100, or even 500 acres are increasingly adopting modular solar irrigation infrastructure — and the economics at scale are compelling. Instead of running a single massive pump from a centralized grid connection, large farms are moving toward distributed solar pump stations positioned throughout the property, each serving a defined irrigation zone.
This decentralized approach actually improves system reliability. If one pump station develops a mechanical issue, the rest of the field continues irrigating normally. A single centralized pump failure, by contrast, can leave an entire farm without water during a critical growth period. The distributed solar model eliminates that single point of failure entirely.
How to Size a Solar Array for Extensive Crop Fields
Sizing a solar array for a large farm starts with calculating the total daily water volume required across all irrigation zones, then working backward to determine the pump capacity and daily run hours needed to deliver that volume. From there, you calculate the total watt-hours of electricity needed per day, add a 20% buffer for system inefficiencies and seasonal solar variation, and size your panel array to reliably generate that output based on your location’s average peak sun hours. For a 50-acre vegetable farm in central California receiving 6 peak sun hours per day, a system requiring 30 kWh of daily pump energy would need approximately a 6 kW to 7 kW solar array, plus battery storage sized for your required backup capacity.
Managing Multiple Irrigation Zones with Solar Power
Large farms with diverse crop types or soil conditions typically divide their fields into multiple irrigation zones, each with different run times, flow rates, and scheduling requirements. Solar-powered systems handle multi-zone management through automated zone controllers — devices like the Rain Bird ESP-TM2 or Orbit B-hyve Pro that sequence zone activation based on pre-programmed schedules or sensor inputs. Each zone valve opens and closes independently while the solar pump runs continuously through the full irrigation cycle. Battery storage ensures the controller and pump remain powered through the entire sequence even if cloud cover reduces solar input mid-cycle.

Farm Conditions That Determine System Suitability
Solar micro-sprinkler systems are highly effective — but they’re not universally optimal for every farm condition without proper assessment. Before committing to a system design, three site-specific factors will determine whether your investment performs as expected or falls short: available sunlight, soil characteristics, and crop water requirements.
Getting these assessments right upfront is what separates a system that pays for itself in five years from one that underperforms and requires expensive retrofitting. Each factor directly influences a different component of system design, and they need to be evaluated together rather than in isolation.
Sunlight Hours and Geographic Location
Your farm’s average daily peak sun hours — the number of hours per day that solar irradiance averages 1,000 watts per square meter — is the single most important variable in solar array sizing. Farms in Arizona, New Mexico, and Southern California regularly receive 6 to 7 peak sun hours per day, making solar irrigation exceptionally productive. Farms in the Pacific Northwest or upper Midwest may average just 3.5 to 4.5 peak sun hours, which means a larger panel array and more robust battery storage are needed to deliver the same daily irrigation output.
The National Renewable Energy Laboratory’s (NREL) PVWatts calculator is a free tool that lets you input your farm’s exact coordinates and returns estimated monthly solar production data — an essential step in accurate system sizing. Do not rely on regional averages or manufacturer estimates for this calculation. Site-specific solar data is always the more reliable foundation for system design.
Soil Type and Water Retention Rates
Soil type fundamentally affects how you configure micro-sprinkler run times and cycle frequency. Sandy soils drain quickly and require shorter, more frequent irrigation cycles to keep the root zone adequately moist without losing water below the root depth. Clay soils hold water much longer but absorb it slowly — applying water faster than the soil’s infiltration rate causes surface runoff and uneven distribution, wasting both water and energy. Learn more about solar-powered micro-sprinkler systems to optimize water usage effectively.
Loamy soils represent the ideal middle ground, offering good water retention with adequate drainage, and they’re the most forgiving for micro-sprinkler scheduling. If your farm has highly variable soil texture across different fields — a common situation on farms that span multiple natural soil types — zone-specific irrigation scheduling becomes essential. Each zone should be programmed independently based on its soil’s measured infiltration rate and field capacity.
A basic soil infiltration test takes less than 30 minutes and costs nothing: dig a 12-inch-deep hole, fill it with water twice to pre-saturate the soil, then fill it a third time and measure how long it takes to drain completely. That drainage rate directly informs your micro-sprinkler application rate selection — your sprinkler heads’ precipitation rate should always stay at or below your soil’s measured infiltration rate.
Crop Water Requirements and Spray Pattern Matching
Every crop has a documented daily evapotranspiration (ET) rate that quantifies how much water it loses to the atmosphere through evaporation and plant transpiration under a given set of temperature, humidity, and solar radiation conditions. Matching your micro-sprinkler system’s daily water delivery to your crop’s ET rate — adjusted for rainfall and soil moisture readings — is the foundation of precision irrigation management. Micro-sprinkler heads are available in a wide range of precipitation rates (from 0.10 to 0.50 inches per hour) and spray patterns (full circle, half circle, quarter circle, and strip patterns), allowing you to configure coverage geometry and application rate to fit almost any crop geometry and row spacing. Learn more about solar panels for farm irrigation systems.
How to Design a Solar Micro-Sprinkler System for Your Farm
Designing a system that actually performs to spec requires working through four sequential steps — skipping any one of them introduces sizing errors that compound through the rest of the design. The process starts with your water demand, moves through equipment selection, and ends with automation configuration. Each step builds directly on the outputs of the previous one.
Step 1: Calculate Your Farm’s Daily Water and Energy Demand
Start by determining how many gallons per day your crops require across your total irrigated area. Multiply your crop’s peak ET rate (in inches per day) by your irrigated acreage, then convert to gallons using the factor of 27,154 gallons per acre-inch. That gives you your daily water volume target. From there, select a pump flow rate (in gallons per minute) and calculate the daily runtime needed to deliver that volume. Multiply pump runtime by pump wattage to get your daily energy demand in watt-hours — that number drives every subsequent decision in your system design.
Step 2: Select the Right Micro-Sprinkler Heads for Your Crops
Micro-sprinkler head selection comes down to four variables: flow rate (GPH), precipitation rate (inches per hour), spray radius (feet), and spray pattern geometry. These four numbers need to match your crop row spacing, soil infiltration rate, and daily water volume target simultaneously — which is why head selection happens after you’ve completed your water demand calculation, not before.
For tree crops like citrus, avocado, or almonds, full-circle micro-sprinklers with a 6 to 10-foot spray radius and a flow rate of 12 to 30 GPH are standard. For row crops like peppers or strawberries, strip-pattern or half-circle heads with tighter spacing and lower flow rates — typically 6 to 14 GPH — produce more uniform coverage along the row without wasting water in the bare-soil pathways between rows.
Always verify that your selected head’s precipitation rate stays below your soil’s measured infiltration rate. If a head applies water at 0.45 inches per hour but your soil only absorbs 0.30 inches per hour, you’ll generate runoff regardless of how well the rest of your system is designed. In that scenario, switch to a lower-output head or reduce zone size to lower effective precipitation rate. For farms looking to enhance their irrigation systems, exploring solar panel power solutions could provide an efficient energy alternative.
Leading micro-sprinkler lines worth evaluating for farm-scale irrigation include the Netafim Hadar series, the Rain Bird Q-NET micro-sprinkler system, and the NaanDanJain Tif-Drip micro-jet line. Each offers a broad range of flow rates, radii, and pattern configurations to suit diverse crop and soil combinations.
|
Crop Type |
Recommended Head Style |
Flow Rate (GPH) |
Spray Radius (ft) |
Pattern |
|---|---|---|---|---|
|
Citrus / Avocado |
Full-circle micro-sprinkler |
18–30 |
8–12 |
360° circle |
|
Strawberries |
Strip or half-circle |
6–12 |
4–6 |
180° or strip |
|
Blueberries |
Quarter or half-circle |
8–14 |
5–7 |
90°–180° |
|
Nursery containers |
Low-volume micro-jet |
4–10 |
3–5 |
Full or adjustable |
|
Peppers / Melons |
Strip pattern |
8–16 |
4–8 |
Strip or 180° |
Step 3: Size and Position Your Solar Array Correctly
- Divide your daily energy demand (watt-hours) by your location’s average peak sun hours to get your required solar array size in watts.
- Add a 20% buffer to account for panel degradation, wiring losses, inverter inefficiency, and seasonal solar variation.
- Mount panels at the tilt angle equal to your farm’s latitude for optimal year-round output — for example, a farm at 35° latitude should mount panels at a 35° tilt.
- Orient all panels true south in the Northern Hemisphere (true north in the Southern Hemisphere) to maximize daily sun exposure.
- Avoid shading from trees, structures, or equipment — even partial shading on a single panel can reduce output for the entire string by 20% to 40%.
- Use ground-mounted racking on open fields and roof-mounted racking on barns or equipment sheds where ground space is limited or needed for crop production.
Position your pump station and battery bank as close to the panel array as practical to minimize DC cable runs and reduce resistive energy losses. For every 100 feet of cable between your panels and pump controller, wire sizing becomes increasingly critical — undersized wiring generates heat and wastes energy that your panels worked to produce.
For systems larger than 5 kW, a professional solar installer or agricultural engineer should review your array layout and wiring design. The upfront cost of that review — typically $300 to $800 — can prevent far more expensive errors in equipment sizing or code compliance that would require a system redesign after installation.
If your farm has multiple fields in different locations, consider a distributed pump station model: install a separate, smaller solar array and pump at each field location rather than running long mainlines from a single centralized pump. Shorter pipe runs reduce friction losses, lower required pump pressure, and simplify system expansion as your irrigated acreage grows.
Step 4: Integrate a Controller and Automation for Efficiency
An automated irrigation controller is what transforms a functional solar pump system into a precision water management tool. At minimum, program your controller to run irrigation cycles during mid-morning hours — after dew has dried but before peak afternoon heat — to reduce evaporation loss from sprinkler application. For more advanced management, integrate soil moisture sensors like the Irrometer Watermark 200SS or the Sentek EnviroSCAN into your controller inputs. These sensors provide real-time root zone moisture data that can trigger irrigation only when soil moisture drops below a set threshold, preventing both overwatering and drought stress automatically. Pair that with a solar production monitor on your battery bank so your controller can modulate irrigation intensity based on available stored energy — running full zones when the battery is fully charged and reducing runtime during extended low-solar periods to protect battery depth of discharge.

Solar Micro-Sprinklers Are the Smarter Long-Term Investment for Sustainable Farms
The numbers make a clear case. Solar micro-sprinkler systems reduce water consumption by up to 50% compared to conventional overhead irrigation, eliminate up to 70% of irrigation energy costs, and carry a typical payback period of 4 to 8 years depending on farm size, crop value, and prior energy costs. After payback, the system generates decades of near-zero-cost irrigation — with solar panels carrying 25-year performance warranties and micro-sprinkler hardware lasting 15 to 20 years with basic maintenance. Many farms also qualify for federal and state agricultural energy efficiency incentives, including the USDA Rural Energy for America Program (REAP), which can cover up to 50% of eligible system installation costs through grants and loan guarantees. That combination of reduced operating costs, available incentives, and long equipment lifespan makes the financial case for solar micro-sprinkler adoption genuinely difficult to argue against.
Beyond the financial return, these systems represent a meaningful shift in how farms interact with natural resources. Water drawn more efficiently, energy sourced renewably, and crops irrigated more precisely — all simultaneously. That’s not just a sustainability statement. It’s a competitive advantage as water regulations tighten, energy costs climb, and consumers continue placing premium value on sustainably produced food. The farms building this infrastructure now are positioning themselves for the agricultural landscape of the next 30 years, not just the next growing season.
Frequently Asked Questions
Quick Reference: Solar Micro-Sprinkler System FAQs
Q: Does it work in cloudy weather? Yes, with battery storage sized for 1–2 sunless days.
Q: What does installation cost? $3,000–$25,000+ depending on farm size and system complexity.
Q: Which crops aren’t suitable? Flood-irrigated rice and crops requiring full soil saturation.
Q: How long do panels last? 25–30 years with most manufacturers guaranteeing 80% output at year 25.
Q: Are permits required? Varies by state and system size; electrical and water permits are commonly required.
Can Solar-Powered Micro-Sprinkler Systems Work During Cloudy Weather?
Yes — with the right battery storage in place. A properly sized LiFePO4 battery bank stores surplus solar energy generated on sunny days and releases it during overcast periods, keeping your pump and controller running through one to two consecutive sunless days without any interruption to your irrigation schedule. The key is accurate battery sizing during system design, based on your daily energy consumption and the number of low-solar days your region typically experiences. Systems without battery storage will reduce or stop output during heavy cloud cover, which is why battery integration is strongly recommended for any farm where irrigation continuity is operationally critical.
How Much Does a Solar Micro-Sprinkler System Cost to Install?
Installation costs vary widely based on system size, component quality, and site complexity. A basic small-farm system covering 1 to 2 acres — including a 1 kW to 2 kW solar array, a 1 HP pump, basic battery storage, and micro-sprinkler hardware — typically costs between $3,000 and $8,000 installed. Mid-scale systems for 5 to 20 acres with automated zone controllers, larger battery banks, and higher-capacity pumps generally run $10,000 to $25,000. Large commercial installations exceeding 50 acres can reach $50,000 to $150,000 or more depending on system complexity.
Before finalizing your budget, check your eligibility for the USDA REAP grant program, which covers up to 25% of project costs through grants and up to 75% through guaranteed loans for qualifying agricultural producers. Some states also offer additional agricultural solar incentives on top of federal programs. Combined incentives can reduce net installation cost by 30% to 50% in many cases, significantly improving your payback timeline.
What Crops Are Not Suitable for Micro-Sprinkler Irrigation?
Crops that require complete soil saturation or standing water — most notably flooded rice paddies — are not compatible with micro-sprinkler delivery methods. Crops grown in very heavy clay soils with extremely low infiltration rates can also present challenges, as micro-sprinkler application rates may consistently exceed what the soil can absorb even at the lowest available precipitation rate settings. In those cases, subsurface drip irrigation is typically the more appropriate precision irrigation solution. For the vast majority of fruit, vegetable, nursery, and orchard crops, however, micro-sprinkler systems offer a well-matched delivery method that outperforms both overhead and flood irrigation on efficiency and precision.
How Long Do Solar Panels Last When Used for Farm Irrigation?
Most commercial-grade solar panels carry a 25-year linear performance warranty guaranteeing that output will remain at or above 80% of the panel’s original rated wattage at the 25-year mark. Real-world panel lifespans routinely exceed 30 years, with annual output degradation averaging 0.5% to 0.7% per year for quality monocrystalline and polycrystalline panels under normal conditions. Agricultural environments can introduce additional stressors — dust accumulation, chemical drift from crop spraying, and physical damage from farm equipment — so proper panel placement away from high-traffic areas and a seasonal cleaning schedule are important for maintaining full output over the system’s life. For more insights on solar panel power solutions, visit this comprehensive guide.
Inverters and charge controllers typically carry 10-year warranties and may require replacement once during a panel system’s lifetime. Battery storage systems, particularly LiFePO4 chemistry, are rated for 3,000 to 5,000 full charge cycles — equivalent to 8 to 15 years of daily irrigation use before capacity drops below 80%. Planning for one battery replacement within a 25-year system lifespan is a reasonable and prudent budget assumption.
Do Solar-Powered Irrigation Systems Require Special Permits or Approvals?
In most jurisdictions, solar-powered irrigation systems require at least two categories of permits: electrical permits for the solar array and battery system installation, and water use or well permits if the system draws from a private well or surface water source. Electrical permit requirements are governed at the state and local level, and in many areas require installation by a licensed electrical contractor. Systems above a certain wattage threshold — commonly 10 kW — may also require utility notification even for fully off-grid systems in some states.
Agricultural water permits vary significantly by region. In western U.S. states operating under prior appropriation water law — including California, Colorado, Arizona, and Nevada — any new or expanded water use from wells, rivers, or streams typically requires a water rights permit or amendment to an existing water right. These permits are issued by state water resource agencies and can involve application timelines of several months to over a year in water-stressed regions.
The straightforward path forward is to contact your county agricultural extension office before beginning system design. Extension agents can identify the specific permit requirements for your location, connect you with state agricultural energy incentive programs, and often provide free technical assistance for farm irrigation planning. Starting the permit process early prevents project delays that could push installation past your target planting season.
If you’re ready to put precision irrigation and renewable energy to work on your farm, Growing Solar Mist offers in-depth resources and expert guidance to help you design, size, and implement a solar micro-sprinkler system that fits your specific crops, land, and budget.



Leave a Reply